Installing the Gateway Software
Now that we have explored the data that is available from the PLC we will install the Edge Gateway software which will allow us to ingest the PLC data into the data lake.
Make sure you are still on the gateway instance with the shell. The next step you will do is install AWS IoT Greengrass on the gateway instance. AWS IoT Greengrass is software that lets you run local compute, messaging between and management of connected devices (like the PLCs in our example), synchronization, and ML inference capabilities on edge devices.
Install AWS IoT Greengrass
To ease the installation, we have provided all the required files in the S3 bucket that was deployed by the CloudFormation template. You can either copy the name of the bucket from the outputs in the previous tab you left open or use the following command via the terminal window to like the bucket name.
aws s3 ls
Paste in the bucket name into the below command, it should start with manufacturing-datalake-workshop... and execute it:
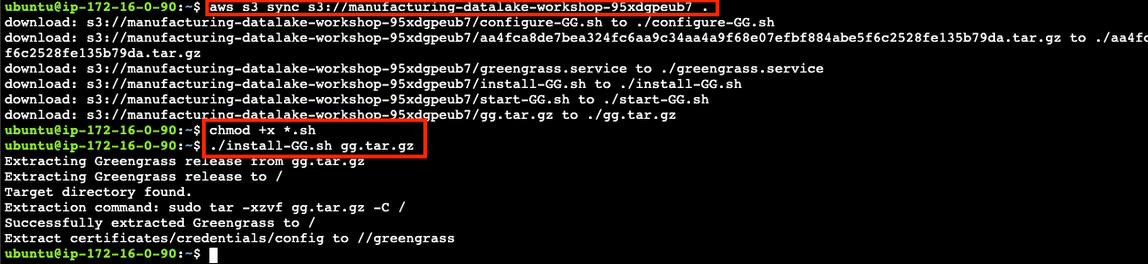
aws s3 sync s3://<bucket name> .
Note that there is a space and a dot at the end of the command.
The command uses the AWS CLI to copy all files from the bucket to the current directory. Among the copied files are the Greengrass install file (gg.tar.gz), a configuration file that contains certificates and a Systemd file (greengrass.service) that allows installing Greengrass as a system service. The remaining files are script files that ease the installation process and reduce the effort required by typing Linux commands.
To install AWS Greengrass into the /greengrass directory on the local file system, execute the following two commands:
chmod +x *.sh
./install-GG.sh gg.tar.gz
Note that it is possible to use the auto-complete functionality of the command line by pressing TAB, i.e., it is sufficient to press “./in<TAB> gg.<TAB>” for the command above. The resulting output on the command line for the previous three steps should look as follows:
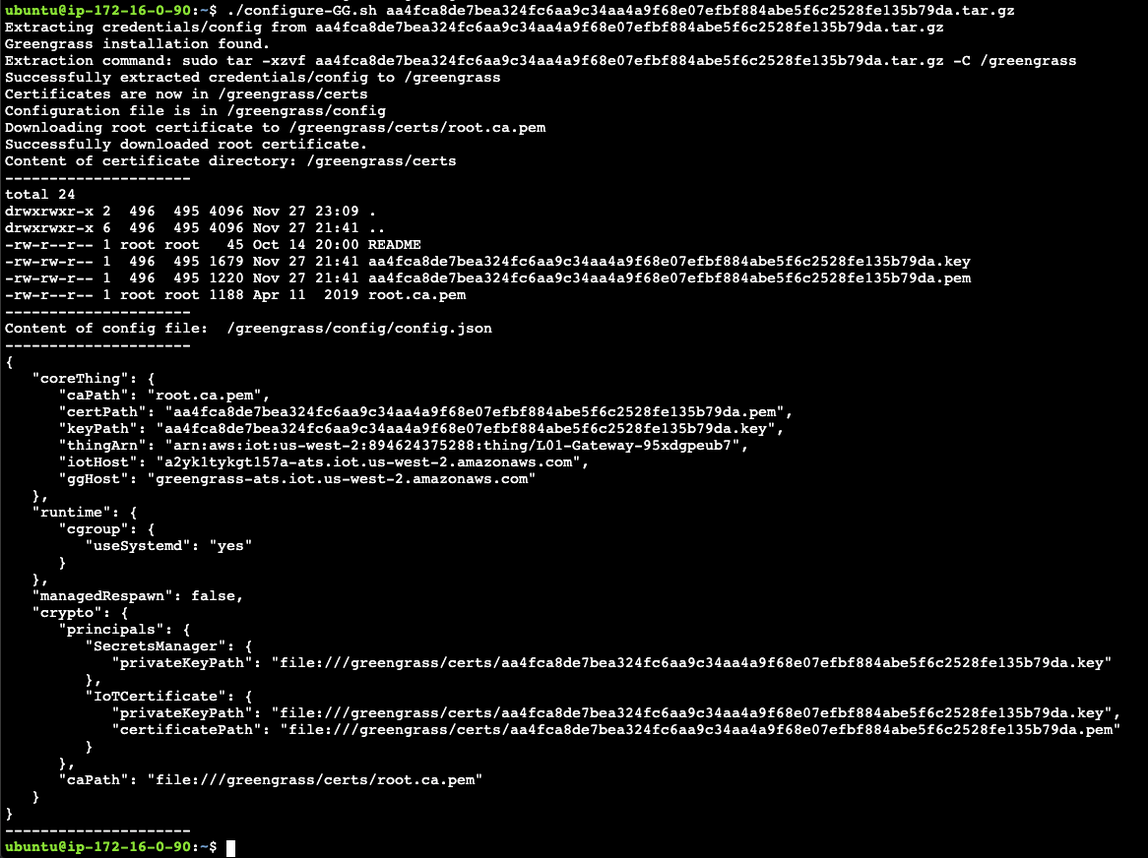
To run AWS Greengrass, it needs a configuration file as well as a private and a public key. This is required since AWS IoT expects every device to use TLS 1.2 with mutual authentication. All of these keys and files have been included in the tar.gz file which has a long hex string as its name (in the example above, the file name starts with “aa4f”). The hex string name is the certificate ID of the certificate that is unique to this AWS Greengrass Core, i.e., every industrial gateway has its own set of keys. To install these files properly, execute the following command:
./configure-GG.sh <certificate ID>.tar.gz
Recall that auto complete will help you entering long file names, i.e., it is sufficient in this case to type “./con<TAB> f94<TAB>”. Note that the file name will be different for every participant. The configure script copies the files in the tar.gz archive into the proper locations for our AWS Greengrass installation and then outputs the configuration that will be used by Greengrass. The output should look similar to the following:
AWS Greengrass is now ready to run and connect to AWS IoT Core. Production deployments have to ensure that AWS Greengrass will run and even automatically restarts in case of a system restart. Hence, the next sections show how to install it as a Systemd service.
Installing AWS Greengrass as a Systemd service
Systemd is a Linux daemon/program that ensures that certain core functions of a system are run during boot or restarted whenever they fail. To ensure that Greengrass starts whenever the gateway is restarted, we install and start AWS Greengrass as a system service using the following commands:
sudo cp greengrass.service /etc/systemd/system
sudo systemctl enable greengrass.service
sudo systemctl start greengrass.service
sudo systemctl status greengrass.service
All commands need to be prefixed with sudo, as they require elevated administrator rights. The first command copies the greengrass.service file into the directory of the Systemd service, the second asks Systemd to enable the service and the third actually starts AWS Greengrass. The final command asks Systemd to print the status of the service and results in the following output:
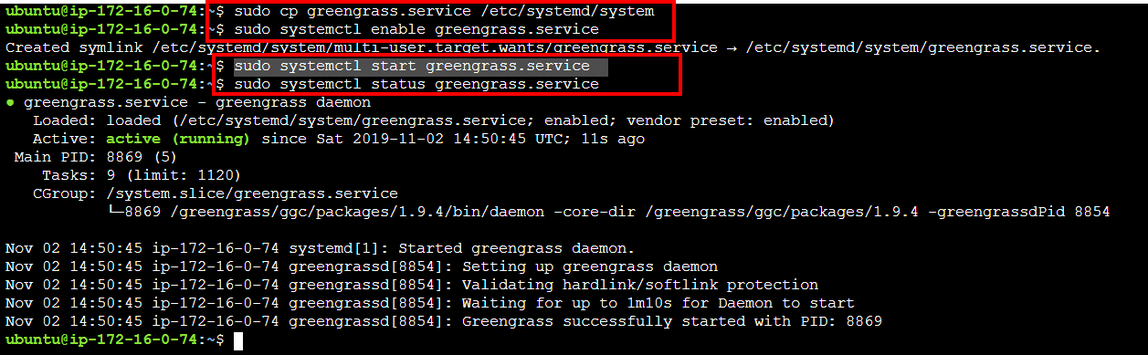
The status command shows that AWS Greengrass is “active (running)" and we can now start using Greengrass to extract data from our PLCs into the data lake.
